
The TMPGEnc DVD Author Start Screen
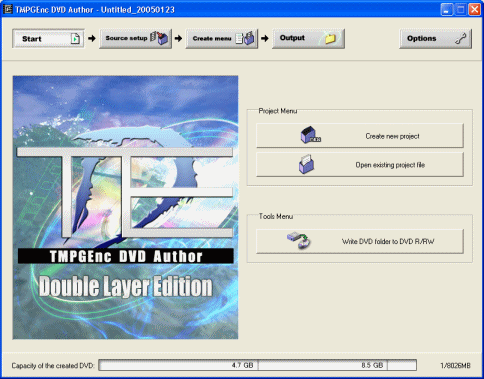 The main TMPGEnc screen is quite simple and looks a lot like TMPGEnc XPress and TMPGEnc MPEG Editor. At the top you have your button bar that represent a different part of the process of creating a DVD. The Project Menu, has two choices, Open New Project and Open Existing Project. If you try to open a new project while working on one, you will be asked if you wish to save the current project first. All the files that were used in a saved project must still be in the same directory or else TMPGEnc DVD Author will ask you to locate them. If the files are gone, then you will not be able to use this existing project.
Under the tools menu there you will see the Write DVD folder to DVD R/RW button. This launches the writing tool.You do not have to have created a DVD folder with TMPGEnc DVD Author in order to use the DVD writing tool to burn for you or create an ISO image from an existing DVD folder. We will take a closer look at the writing tool towards the end of this guide, but first we must take a look at the Options button in the top right corner.
The Options
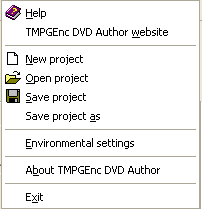 The options button contains Help, TMPGEnc DVD Author website, New Project, Open Project, Save Project, Save Project As, Environmental Settings, About TMPGEnc DVD Author and Exit. The Help button launches the programs help file which is a great resource if you ever get stuck. The TMPGEnc DVD Author website button will launch the programs official site in your default web browser.
New Project is the same as the Create New Project button on the main screen, as Open Project is the same as Open Existing Project file on the main screen. Save Project allows you to save a project you are currently working on. After the first time saving it you will no longer be asked to choose a location to save the file. Save project as, will save the project to a file for you but will always ask you where you wish to save the file.
Environmental settings are covered separately in this guide. About TMPGEnc DVD Author, shows you version information on TMPGEnc DVD Author and also shows you an AC3 logo if you have purchased the AC3 plugin. The Exit button will shutdown the program. You may be prompted to save your current project if you haven't already. It's time now to take a closer look at the Environmental Settings.
Environmental Settings
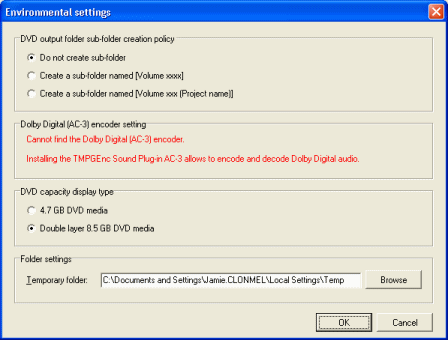 The first thing you see in the Environmental Settings is the DVD output folder sub-folder creation policy. The option Do not create sub-folder will not create any sub folder in your output folder. Instead you will just get a VIDEO_TS and AUDIO_TS folder. Create a sub-folder named [Volume xxxx] means that the program will save a sub-folder in your output folder called something like "Volume 1". The VIDEO_TS and AUDIO_TS folders will be inside this sub-folder. Create a sub-folder named [Volume xxxx(Project Name)] will create a sub-folder in your output folder containing the Project Name. Your VIDEO_TS and AUDIO_TS folders will be inside this folder.
The Dolby Digital (AC-3) encoder setting can only be used if you have purchased the AC3 plug-in, otherwise you will get an error just like in the pic. However, if you have purchased it, then you have two options. Re-encode LPCM audio to Dolby Digital (AC-3) Audio as Default means that whenever you use PCM audio in a project, it will automatically be re-encoded to AC3 audio at 256kb/s. Re-encode MP2 audio to Dolby Digital (AC-3) audio as default means that whenever you use MP2 audio in a project it will automatically be re-encoded to AC3 audio with the closest possible birate (e.g. 48khz 224kb/s MP2 --> AC3 224kb/s).
The DVD capacity display type options are next. 4.7 GB DVD media means you are using Single Layer (DVD5) DVD-/+R media that can hold a max of 4.7GB (4.36GB really). Double layer 8.5GB DVD media means that you are using Dual Layer (DVD9) DVD-/+R media that holds about twice the capacity as single layer media but a DL DVD burner is required. The Folder settings just allow you to specify a temporary folder to where temp files will go during an encoding process, please make sure that you choose a partition with enough disk space for temporary files. Now we are ready to move to the Set Source Screen. You can get there simply by clicking the Source Setup button on the Start Screen or by creating a new project.
The Source Setup Screen
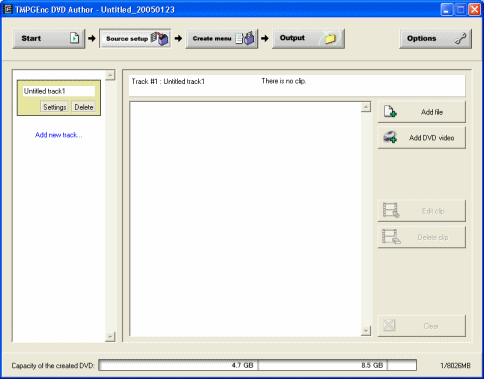 From the source setup screen you will be able to Add files, Manage Tracks, change output audio formats, set chapters and edit video and audio streams. The screen is easy to understand. On the left side of the window is the tracks list, beside it in the middle you have a clip list and to the right of the clip list are some buttons. On top of these is the track information. First lets take a quick look at the buttons available.
Add file allows you to add an MPEG file, or an audio file, or both multiplexed. Add DVD-Video lets you add DVD Video that has already been authored before. This is useful especially if you have recorded something from a standalone DVD recorder. Edit Clip allows you to edit a clip that is selected in the clip list. Delete clip removes a selected clip and clear will remove all clips. Clear will remove all clips from the clip list. Now we'll look at the track list options.
Add new track adds a whole new track that you can add clips to. Track title allows you to simply change the track title. Settings allows you to change things such as the output audio format, or if even the audio needs to be re-encoded. Delete will completely remove a track. The Clip list is very easy too. When you have files added to it, you have some options. Edit lets you edit the clips chapter points and allows you to cut out area's of the clip so they wont appear on the output DVD. Delete will delete the clip. Adding and editing clips is next.
Written by: James Delahunty
